¶ Overiew
The A/V team primarily oversees sound reinforcement systems.
We also help set up and maintain TV screens and projectors.
Typically stationed in Main Events and Panel areas, the A/V department is a critical part of our shows. We keep the speakers sounding full and the elements of sound well balanced. Panelists rely on us for technical help with HDMI inputs, television screens, projectors, etc.
¶ Goals
At every event we aim to have:
- Clear, strong sound
- An accurate and uplifting representation of artists
- Smooth transitions between sets and panels
- No feedback
- No distortion
- Clean wiring
¶ Essentials
Volunteers don't need to know everything. Our core staff will typically be on the equipment all day.
You just need to know how to ride the faders, and help us watch out for the equipment. We may ask you to check the sound levels in the audience and report back, or cover for us while we step away for a moment.
There's really two main things...
- Please don't let anyone place food or drinks near the equipment.
No liquids or food near the equipment!
- Adjust the volume to keep everything sounding nice, and to avoid feedback.
Ride the faders to avoid clipping/distortion.
Prevent feedback by instructing performers on mic usage.
¶ Cable Management
We take pride in cable management, and do our best to set up audio-visual elements that are practical yet pleasing to the eye. This is accomplished by setting up equipment deliberately and carefully, and not rushing. Start early and don't panic!
¶ Feedback
Don't let performers stand directly in front of speakers with a microphone. That will almost always cause feedback.
We have other ways to prevent feedback, like panning the vocal signal to the speaker opposite of where they're standing, but that gets tricky. The best bet is to instruct performers to stay put in a spot that gives the audience the best sound.
We will "ring out" the sound system to set our levels correctly before the event starts.
¶ Gain Staging
We use the GAIN knob to set the actual input levels. Then we use the FADER to control the volume.
¶ The Tools
Armed with a mixing board, audio monitors, and our own ears, we can sculpt out quality sound. Gain staging sets a solid beginning, and makes riding the fader much easier when balancing live performances. Crossovers and amplifiers help power the speakers appropriately with the right sound waves.
¶ Gaffer Tape
We use gaffer tape to seal wires to the ground and prevent tripping hazards.
¶ Mixing Board
The Yamaha MG10XUF is our most powerful weapon. It is the central hub of all sound. Everything goes in and out of it.
Let's take a look at the channels. Here's four shown from left to right.
(1) indicates the physical input. This is where we feed things like microphones, turntable outputs, instruments, and things that we want to amplify.
(2) applies a pad to dim/lower the sound if it's coming in too hot/loud. When it's pushed down, it's activated/on. You will need to activate this for signals that trigger the PEAK light (11). If you see that red PEAK light fire on, the signal for that channel is too loud!
(3) cuts out the very low end bass. This is useful for clarity, especially with vocals.
(4) adjusts the GAIN. This is the first stage and most important part of setting the right volume. Gain represents the actual input level, before it ever hits the fader (the big knob at the bottom of the mixer that you slide upwards for more volume, and all the way down to silence). A little bit goes a long way. Start by moving the GAIN from all the way down, slowly up into the 1/4 position with the marked box. The goal is to never or barely see the red PEAK light trigger during the loudest parts of the performance. It's important to ring out the mics and have the performer play their loudest for a brief moment.
(5) applies compression. In most cases we leave this off, all the way down at 0. It can help glue up some vocals, but too much compression can ruin a performance too.
(6) turns on power for wired mics. We typically will have this OFF because we're using wireless mics that are battery powered instead.
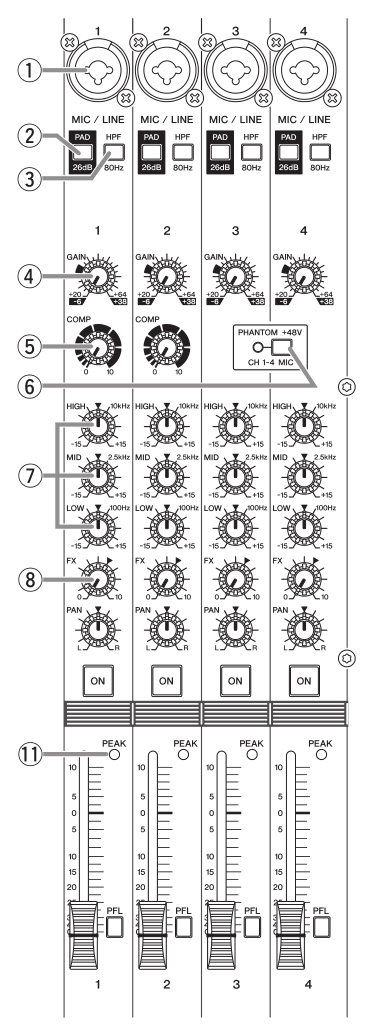
(7) is the EQ. Highs, mids and lows.
(8) applies effects.
(9) pans the signal from left to right. Sometimes we need to use this to mimic stereo inputs by putting one channel full left and the other full right. Sometimes we can use this avoid feedback by sending instruments to one speaker near the singer, and vocals to another speaker further away from the singer. There's a lot of utilitarian uses for this knob. Otherwise, keep it in the middle.
(10) is really important. Activating it turns that channel on. It will light up. It's best practive to turn all the channels off, except for the ones we're using.
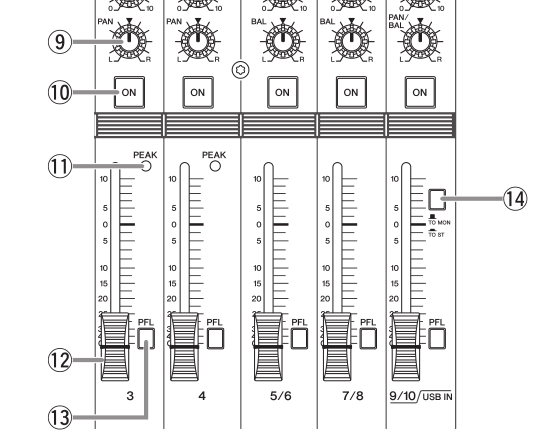
(11) is our infamous PEAK light again! Very important that it doesn't light up red!
Do not let the PEAK light flash red. Apply a pad for extreme situations. Lower the GAIN first. Then adjust the fader.
(12) are the faders. We typically want them to rest at "unity," which is the zero mark. It's roughly 75% the way up. Turning the fader up increases volume, and turning it down lowers it.
"Riding the faders" means actively turning the fader volume up and down to match the performs dynamic range. For example, they start screaming, we turn the fader down. They start whispering, turn the fader up.
Listen to the audio monitors in the booth. Avoid distortion. Avoid clipping.
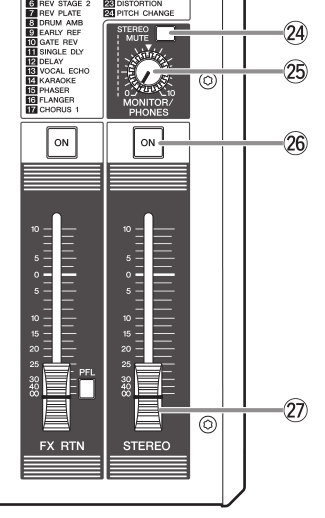
Make sure the main outs are on! Button (26) activates it.
(25) typically controls the "booth monitors," or the speakers that you have available to listen to the mix.
(27) are the faders again! But these are outputs instead of inputs. Again, we want these to rest at unity, at the zero mark.
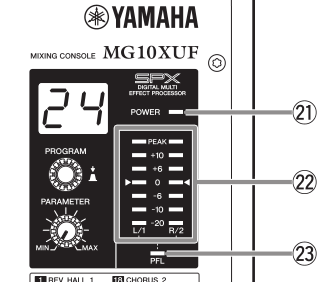
(22) is the audio level meter which shows you the current levels of volume. We're aiming for... you guessed it! Unity! We want this to fall around zero most of the time, poke into the yellow a bit when getting loud, but never peaking into red.
When you have the PFL button activated for a specific channel (13), you will ONLY hear audio and see the meter results for that specific channel in your monitors. When any of these are activated, you will see the PFL light (23) to remind you. Only do this to examine single channels for nuances briefly.
There's a lot more to cover, like effects, using PFL to monitor individual tracks, etc. But that's the main idea.
Read the manual if you want to take the deep dive.
¶ Amps
All the amplifiers also have volume knobs.
The QSC amps we leave pretty much untouched once the levels are good.
¶ Subs
The subs sometimes flake out and need to be tweaked. The potentiometers like to be twisted when misbehaving. Don't let the subs clip, they will burn out, and we need them to thump all day.
You may need to also reverse the polarity a few times by toggling the in/out switch. This typically fixes it if the sub stops producing volume.
¶ Crossover
Sometimes we may need to adjust the crossover frequency, or where the signal is split. It usually sounds pretty good sending the MSL-3s and the subs everything below 120-180 Hz, somewhere in that zone. Different genres may need adjustments.
¶ Signal Flow
All inputs go into the mixer.
The mixer feeds all the outputs.
First, it sends the main signal into a Crossover, which divides the bass and higher frequencies into two separate stereo signals:
-
We run the bass signals into our subwoofers, which also have built-in crossovers. The HPF output from the subwoofers feed into a QSC amp that powers a stereo pair of MSL-3s fed by speakon cable.
-
The higher frequencies are sent to another QSC amp which powers the Yamaha tops via regular TRS speaker cable.
Also, our mixer sends the signal to our monitors, which are self-powered.
Finally, we run a single TRS cable out of the L output of the stereo out (resulting in a summed mono signal) and send that to a third QSC amp which uses one channel to power a stage monitor. This is so performers can hear themselves.
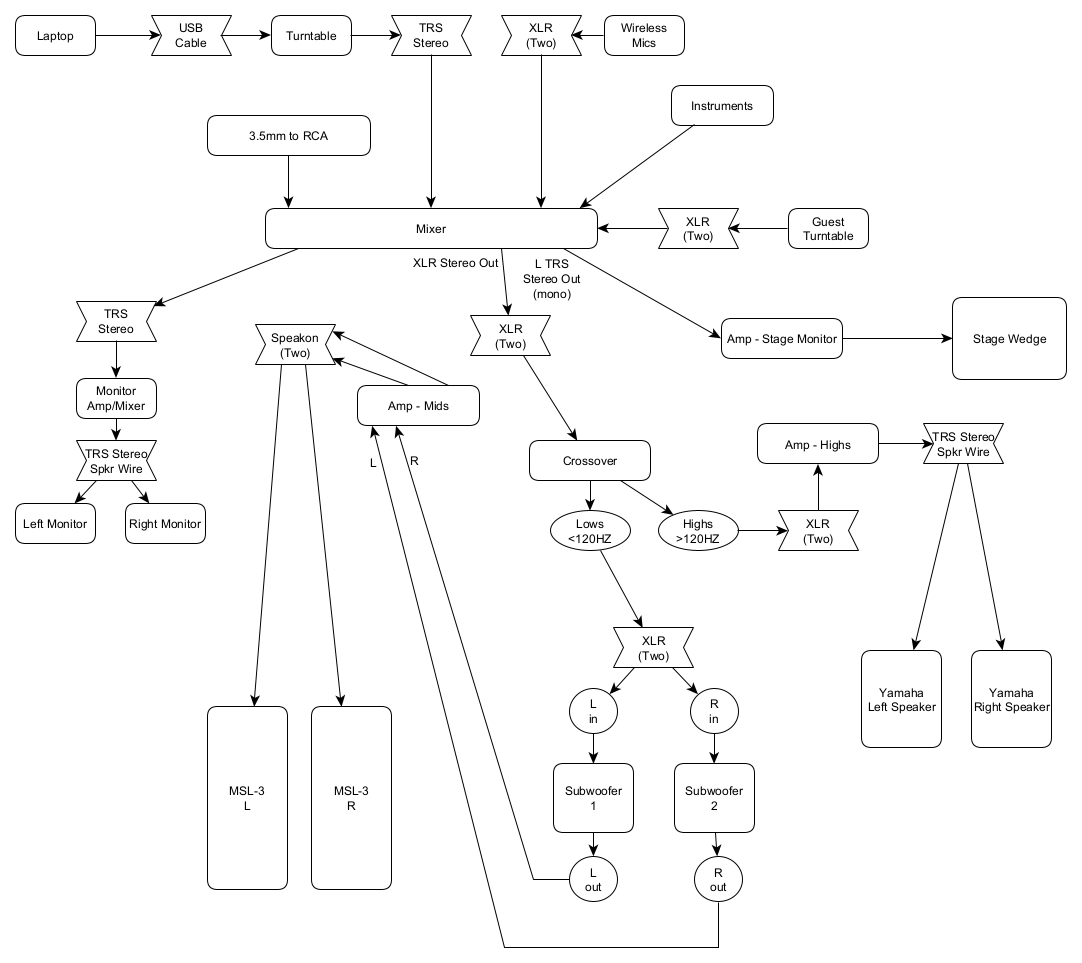
Note: might want to add a volume knob to the signal flow for the stage wedge.
The FX SEND can also be hacked as another output, with each channel giving it volume via the FX dial. You just need to make sure that the PARAMETER knob is all the way down at MIN so no effects take place. The issue is with this is... you can no longer use effects.
¶ Videos
There's a lot of good resources on the internet.
This one goes over the basic functions of a mixer:
An important one on preventing feedback: